Click here to read Pool Noodle Fine Motor Balance Tray on Hands On As We Grow
With summer just around the corner, this pool noodle fine motor balance tray from Lisa is perfect! Your little one will be eager and excited to play while building their basic fine motor skills.
I love utilizing items that we already have around our house as part of our learning for many reasons. Not only does it allow for spontaneous and hands-on play, it’s an easy way to keep activity costs in check.
In our case, we had plenty of pool noodles in our garage that were just waiting to be used for something other than swimming!
This pool noodle fine motor balance tray is a simple fine motor transfer activity. It strengthens hand-eye coordination and allows for the optional development of pattern following.
Build Your Pool Noodle Fine Motor Balance Tray
Your little one will love the fun challenge of balancing those pom poms on each slice without letting them fall through the hole!
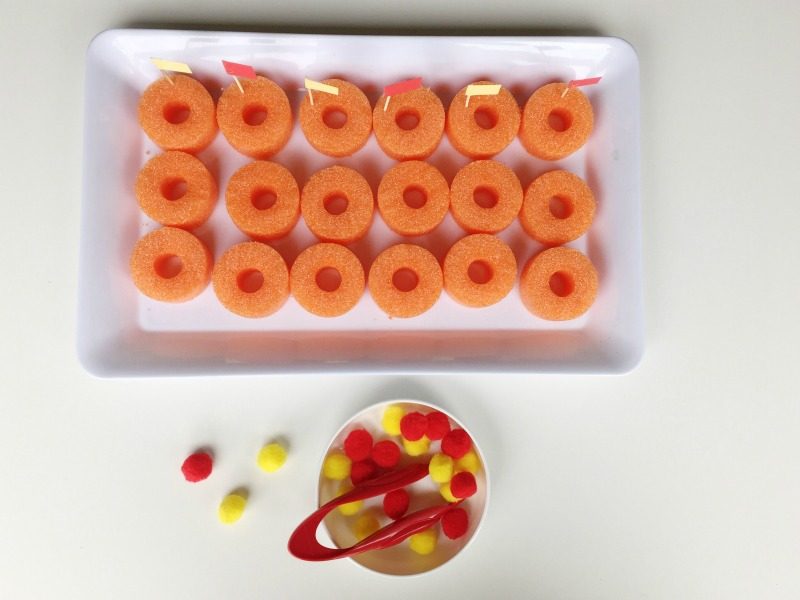
To create this tray, you will need one pool noodle (on the thinner side), a handful of medium size pom poms, along with a child size tweezers (affiliate link).
I used a kitchen knife to cut slices of the pool noodle about 2 inches wide and then arranged them on my tray, with the bowl of pom poms next to it.
If you are wanting to try this with a younger child who has not quite developed the skill of tweezers, you can modify the activity by having them use their fingers. This will help reinforce their developing pincer grasp.
Although the main focus of this activity is the development of fine motor skills, I decided to add an extra learning benefit to this activity by introducing patterns to my three-year-old.
Using toothpicks and cardstock, I created colored flags to match the same color of pom poms he chose. I chose to only pattern the first row for him in encouragement that he would continue the pattern on his own as he went on.
Let your child get creative!
Ezra was so excited to start his challenge!
He went along quickly, utilizing his hand strength while grasping his pom poms with the tweezers. Ezra was carefully balancing each pom pom on top of the hole.

He followed the pattern correctly with the first row of flags. Then he continued on with the same pattern throughout the duration of the activity.
He called out each color as he balanced it on top of each pool noodle slice!

After he completed the tray, he decided to push each pom pom through the hole.
He had so much fun doing this and enjoyed the added tactile sensory benefit.

The, he decided he wanted to build a tower of all the slices on his tray. He was counting out loud to see how many he could stack until it toppled over.
I love activities that allow for multiple interpretations and learning. It is so fun to see!

In the end, this tray turned into multiple activities and learning opportunity for him.