
***** ToddlerActivities ******** Sponsored by: www.anycard.games No In-built rules. Play any card games just like holding cards in your hand with upto 10 players online!! Free to join and free joining in-game cash Bonus for limited time!!
Wednesday, October 31, 2018
Tuesday, October 30, 2018
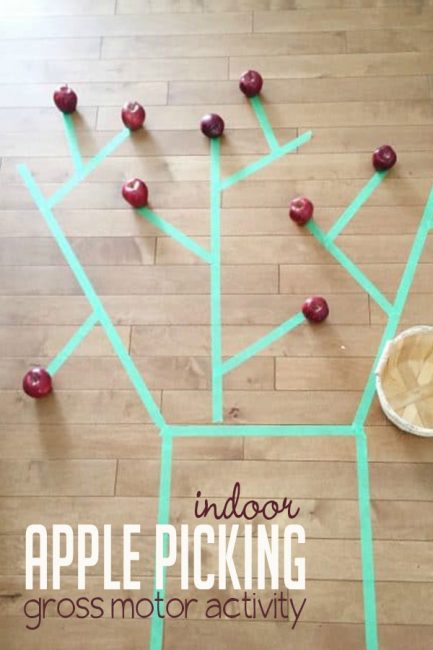
No Prep Gross Motor Indoor Apple Picking Activity
Click here to read No Prep Gross Motor Indoor Apple Picking Activity on Hands On As We Grow®
Finding an active indoor activity can be challenging as the days get shorter and the temperature drops. This simple gross motor activity from Lisa will keep your little ones engaged and busy!
I love using seasons and themes as a basis for learning in our home. September is one of my favorite months for all the different possibilities it has to offer.
This month our focus is all about apples in our home. I came up with a fun gross motor activity by using painters’ tape from our garage and apples from the fridge.
This activity is perfect for inside and has a quick and easy setup, which is always a win in my books!
To being with, I taped off a tree trunk using the painters’ tape in a spacious area of our house that would allow for a variety of movement.

I extended the tree by taping off branches in a variety of directions. On each end of the branches, I placed apples for my son to pick.
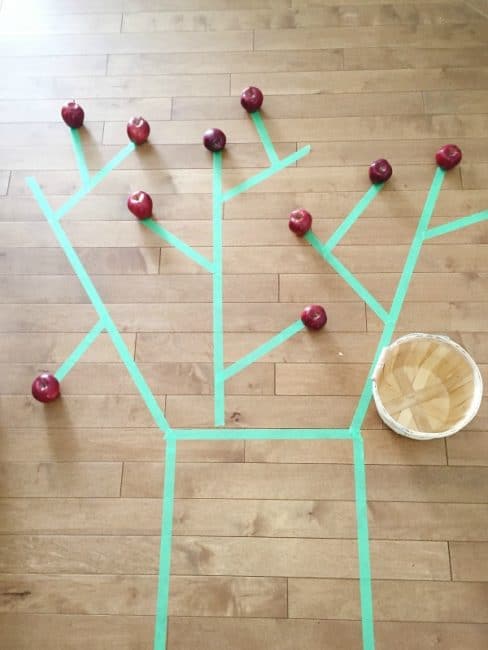
Before we started, I explained to him that he could use his basket to pick all the apples off the branches. To do this, we would need to come up with some fun movements and actions to pick the apples.
I love giving children the independence in their learning and play. He was pretty excited to offer suggestions too!
He first decided that he wanted to jump on two feet to pick his apples.

When he reached his basket, I asked him to balance on each branch while he picked an apple and put it in his basket.

He loved the challenge of making sure he didn’t fall off the branches!
After he had picked all his apples, he then decided that he would like to try jumping on just one foot to his basket.

Of all the different actions we tried, this was his most challenging.
We also tried movements such as walking backward to the branches and straddling the tape line on the trunk.

We tried walking sideways crisscrossing one foot over the other.
Another fun move was jumping back and forth from each branch, making sure that we stayed on the line of tape.
This movement was his favorite!

During the activity, I also took the opportunity to incorporate a few other learning activities.
These activities reinforced skills he has developed or is currently working on developing. For example, I had him count the number of apples out loud while he was picking.
I also utilized our fine motor skills and had him place the apples back on the tip of the branches when he finished. This was an enjoyable fine motor activity for him!

If you do not have apples on hand, you could use leaves that you collect on a nature walk. A great way to extend the fun and learning from another activity!
What is your favorite gross motor activity to do in the fall with your little ones? Share your best ideas in the comments!
No Prep Gross Motor Indoor Apple Picking Activity
Click here to read No Prep Gross Motor Indoor Apple Picking Activity on Hands On As We Grow®
Finding an active indoor activity can be challenging as the days get shorter and the temperature drops. This simple gross motor activity from Lisa will keep your little ones engaged and busy!
I love using seasons and themes as a basis for learning in our home. September is one of my favorite months for all the different possibilities it has to offer.
This month our focus is all about apples in our home. I came up with a fun gross motor activity by using painters’ tape from our garage and apples from the fridge.
This activity is perfect for inside and has a quick and easy setup, which is always a win in my books!
To being with, I taped off a tree trunk using the painters’ tape in a spacious area of our house that would allow for a variety of movement.
I extended the tree by taping off branches in a variety of directions. On each end of the branches, I placed apples for my son to pick.
Before we started, I explained to him that he could use his basket to pick all the apples off the branches. To do this, we would need to come up with some fun movements and actions to pick the apples.
I love giving children the independence in their learning and play. He was pretty excited to offer suggestions too!
He first decided that he wanted to jump on two feet to pick his apples.
When he reached his basket, I asked him to balance on each branch while he picked an apple and put it in his basket.
He loved the challenge of making sure he didn’t fall off the branches!
After he had picked all his apples, he then decided that he would like to try jumping on just one foot to his basket.
Of all the different actions we tried, this was his most challenging.
We also tried movements such as walking backward to the branches and straddling the tape line on the trunk.
We tried walking sideways crisscrossing one foot over the other.
Another fun move was jumping back and forth from each branch, making sure that we stayed on the line of tape.
This movement was his favorite!
During the activity, I also took the opportunity to incorporate a few other learning activities.
These activities reinforced skills he has developed or is currently working on developing. For example, I had him count the number of apples out loud while he was picking.
I also utilized our fine motor skills and had him place the apples back on the tip of the branches when he finished. This was an enjoyable fine motor activity for him!
If you do not have apples on hand, you could use leaves that you collect on a nature walk. A great way to extend the fun and learning from another activity!
What is your favorite gross motor activity to do in the fall with your little ones? Share your best ideas in the comments!
Monday, October 29, 2018
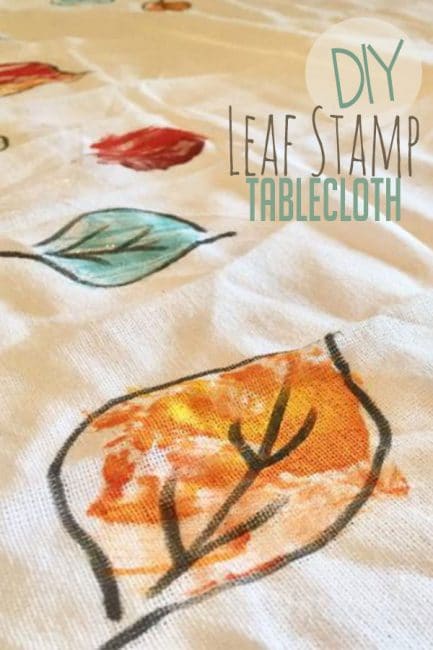
DIY Thanksgiving Leaf Stamp Tablecloth Keepsake for Kids to Make
Click here to read DIY Thanksgiving Leaf Stamp Tablecloth Keepsake for Kids to Make on Hands On As We Grow®
Make a unique leaf stamp tablecloth for your Thanksgiving kids table with an easy idea from Julie!
Your kids will love creating their own four sack Thanksgiving tablecloth. This leaf print activity couldn’t be easier.
My kids love stamping things. From apple stamps to pasta stamps, stamping is just fun!
This Thanksgiving, we wanted to try stamping leaves. But I wanted them to make something that was a keepsake, something we could use year after year.
We stumbled into this cute flour sack leaf stamp tablecloth idea! Our handmade tablecloth will be perfect to decorate the kids table at Thanksgiving dinner.
DIY Thanksgiving Leaf Stamp Tablecloth Keepsake
For our leaf stamp tablecloth, we needed:
- flour sack fabric square
- craft paint
- black fabric marker
- assorted leaves
- tin foil
- plate
- paintbrush
I really love how this project helped my son with following directions and fine motor skills. It also boosts decision-making skills, planning, and learning colors!
How to Make a Thanksgiving Leaf Stamp Tablecloth
First, I covered our table with tin foil. Flour sack fabric is pretty thin, so I didn’t want to worry about paint bleeding through to the table.
Then we went out and collected a few leaves from the backyard. We carefully dusted them off and set them with our supplies.

Time to stamp!
We painted the backs of the leaves and pressed them onto the flour sack. It helped to stamp just one color at a time to keep the colors from getting muddy.
Try more leaf-inspired activities for Thanksgiving or autumn.
We couldn’t help but do some experimenting with color, though.

My son mixed some beautiful shades of yellow and orange together. My favorite combination was red and purple!

Once our stamps were done, we let the paint dry for a few minutes.
Then I outlined the leaf shapes with a black fabric marker.

You could use a Sharpie in a pinch. The fabric marker did a really good job drawing smoothly and not snagging on the fabric.
Older kids could help out with this, but since my children are preschool age and under I tackled this step on my own.

Last, I wrote “Thankful” in the middle of the design.
Try creating this Thankful Tree with your family this Fall!

My kids can’t wait to see their leaf stamp tablecloth on their Thanksgiving table!
What special holiday keepsakes have your children made? Share a photo of your favorites!
DIY Thanksgiving Leaf Stamp Tablecloth Keepsake for Kids to Make
Click here to read DIY Thanksgiving Leaf Stamp Tablecloth Keepsake for Kids to Make on Hands On As We Grow®
Make a unique leaf stamp tablecloth for your Thanksgiving kids table with an easy idea from Julie!
Your kids will love creating their own four sack Thanksgiving tablecloth. This leaf print activity couldn’t be easier.
My kids love stamping things. From apple stamps to pasta stamps, stamping is just fun!
This Thanksgiving, we wanted to try stamping leaves. But I wanted them to make something that was a keepsake, something we could use year after year.
We stumbled into this cute flour sack leaf stamp tablecloth idea! Our handmade tablecloth will be perfect to decorate the kids table at Thanksgiving dinner.
DIY Thanksgiving Leaf Stamp Tablecloth Keepsake
For our leaf stamp tablecloth, we needed:
- flour sack fabric square
- craft paint
- black fabric marker
- assorted leaves
- tin foil
- plate
- paintbrush
I really love how this project helped my son with following directions and fine motor skills. It also boosts decision-making skills, planning, and learning colors!
How to Make a Thanksgiving Leaf Stamp Tablecloth
First, I covered our table with tin foil. Flour sack fabric is pretty thin, so I didn’t want to worry about paint bleeding through to the table.
Then we went out and collected a few leaves from the backyard. We carefully dusted them off and set them with our supplies.
Time to stamp!
We painted the backs of the leaves and pressed them onto the flour sack. It helped to stamp just one color at a time to keep the colors from getting muddy.
Try more leaf-inspired activities for Thanksgiving or autumn.
We couldn’t help but do some experimenting with color, though.
My son mixed some beautiful shades of yellow and orange together. My favorite combination was red and purple!
Once our stamps were done, we let the paint dry for a few minutes.
Then I outlined the leaf shapes with a black fabric marker.
You could use a Sharpie in a pinch. The fabric marker did a really good job drawing smoothly and not snagging on the fabric.
Older kids could help out with this, but since my children are preschool age and under I tackled this step on my own.
Last, I wrote “Thankful” in the middle of the design.
Try creating this Thankful Tree with your family this Fall!
My kids can’t wait to see their leaf stamp tablecloth on their Thanksgiving table!
What special holiday keepsakes have your children made? Share a photo of your favorites!
Thursday, October 25, 2018
Elf on the Shelf Countdown to Christmas

The Elf on the Shelf is counting down the days until Christmas with this adorable printable countdown calendar!
This year the elf is counting down the days until Christmas and he’s using this printable paper chain calendar to do it!

How does the countdown chain work? It’s simple!
Just print out the Countdown to Christmas PDF below and cut out the pieces. Thread the small strips through the opening on the Countdown to Christmas banner and create one loop for each day until Christmas.

Your elf can take one loop off each night to help your kids count down to December 25th!
The best part is that the countdown chain is elf-sized! So fun.
Elf Countdown to Christmas
Supplies Needed:
- Countdown to Christmas Printable (DOWNLOAD HERE)
- Scissors
- Tape
Time Needed to Set Up:

The post Elf on the Shelf Countdown to Christmas appeared first on Kids Activities Blog.
Easy No-Prep Looking and Listening Activity to Practice Mindfulness

Click here to read Easy No-Prep Looking and Listening Activity to Practice Mindfulness on Hands On As We Grow®
Enjoy a quiet outside activity inspired by our Member of the Month, Angela. You’ll practice observational and mindfulness skills just by looking and listening!
Time is limited for parents. Being hands-on takes up time.
First, you research activities and collect supplies. Then you find time in your schedule to actually do the activities.
Our Member of the Month, Angela, felt this time crunch. With two young daughters, she was juggling hands-on activities for her toddler while caring for her infant.
“Before The Activity Room® I felt that I was leaving Matilda on her own too much, especially with a new baby,” Angela explained. “She’s great at independent play.”
Having that unscheduled independent play time is great, but Angela wanted to do more with her older daughter.
“I felt I should be doing things with her but I didn’t have the time or energy or decent internet to be searching for activities.”
Then came The Activity Room! Angela discovered the joys of preplanned hands-on activities and a supportive community.
“I did a week challenge when Matilda was younger and then I got an email about The Activity Room,” Angela shared. “Even though Matilda wasn’t two it was exactly what I was needed: preplanned activities.”
Since Matilda was a young toddler, Angela got creative and made smart swaps to keep the activities age-appropriate.
“I adapted (the activities) to her, and she did what she wanted anyway!”
Angela discovered what so many other Activity Room members have found: it’s process over product! Simply being a hands-on mom is the most important thing.
“I wasn’t worried the activities weren’t like everyone else’s older children,” Angela explained. “I was spending quality time with Matilda and loving it!”
The Activity Room has made it super simple for Angela to be a hands-on mom, even with her hands full!
“Everything’s in one place so no more searching for ideas you get it all a month ahead,” Angela commented.
Plus, they can track each child’s progress with activities, skills, and learning over time.
“We love our Activity folder which Matilda goes back through looking at what’s she done!!!”
Let’s Meet Angela
How many kids do you have and how old are they?
Matilda, 23 months, and Millie, 14 weeks.
How long have you been in The Activity Room®?
Since August
What is your favorite activity you’ve done in The Activity Room®?
Cloud Dough, Dumpster Diving, Flyswatter Painting
What’s your favorite thing to do with your kids when you get a few moments?
We love to read books and do some bird watching
What’s your best tip for doing activities with your kids?
Be prepared! Have the day’s activity set up and ready to grab when you have a moment.
If you were to tell a friend about The Activity Room®, what would you say to them?
Love love love The Activity Room! The activities are quick easy prep and adaptable for all ages.
Each month I get amazing activities sent to me to do with the girls.
All my friends know about The Activity Room®!
Share your favorite quote
Shoot for the moon, even if you miss you’ll still be among the stars
Easy No-Prep Looking and Listening Activity to Practice Mindfulness
Take some time to lie on the grass outside. You’ll simply be looking and listening to the sounds around you.
That’s right. You don’t need anything else or special supplies for this simple mindfulness activity.
Can you identify the birds? Can you pick out whose car is driving past?

Look at the clouds. What shapes can you make from them?
Who can see the same as you? Who can see something different?

This is such a great activity to practice answering open-ended questions. There is no right answer!
Take turns finding shapes in the clouds or sharing things you see and hear. Try just listening with your eyes closed, too.
How does your family practice observation or mindfulness together? Share your ideas in the comments!
Easy No-Prep Looking and Listening Activity to Practice Mindfulness
Click here to read Easy No-Prep Looking and Listening Activity to Practice Mindfulness on Hands On As We Grow®
Enjoy a quiet outside activity inspired by our Member of the Month, Angela. You’ll practice observational and mindfulness skills just by looking and listening!
Time is limited for parents. Being hands-on takes up time.
First, you research activities and collect supplies. Then you find time in your schedule to actually do the activities.
Our Member of the Month, Angela, felt this time crunch. With two young daughters, she was juggling hands-on activities for her toddler while caring for her infant.
“Before The Activity Room® I felt that I was leaving Matilda on her own too much, especially with a new baby,” Angela explained. “She’s great at independent play.”
Having that unscheduled independent play time is great, but Angela wanted to do more with her older daughter.
“I felt I should be doing things with her but I didn’t have the time or energy or decent internet to be searching for activities.”
Then came The Activity Room! Angela discovered the joys of preplanned hands-on activities and a supportive community.
“I did a week challenge when Matilda was younger and then I got an email about The Activity Room,” Angela shared. “Even though Matilda wasn’t two it was exactly what I was needed: preplanned activities.”
Since Matilda was a young toddler, Angela got creative and made smart swaps to keep the activities age-appropriate.
“I adapted (the activities) to her, and she did what she wanted anyway!”
Angela discovered what so many other Activity Room members have found: it’s process over product! Simply being a hands-on mom is the most important thing.
“I wasn’t worried the activities weren’t like everyone else’s older children,” Angela explained. “I was spending quality time with Matilda and loving it!”
The Activity Room has made it super simple for Angela to be a hands-on mom, even with her hands full!
“Everything’s in one place so no more searching for ideas you get it all a month ahead,” Angela commented.
Plus, they can track each child’s progress with activities, skills, and learning over time.
“We love our Activity folder which Matilda goes back through looking at what’s she done!!!”
Let’s Meet Angela
How many kids do you have and how old are they?
Matilda, 23 months, and Millie, 14 weeks.
How long have you been in The Activity Room®?
Since August
What is your favorite activity you’ve done in The Activity Room®?
Cloud Dough, Dumpster Diving, Flyswatter Painting
What’s your favorite thing to do with your kids when you get a few moments?
We love to read books and do some bird watching
What’s your best tip for doing activities with your kids?
Be prepared! Have the day’s activity set up and ready to grab when you have a moment.
If you were to tell a friend about The Activity Room®, what would you say to them?
Love love love The Activity Room! The activities are quick easy prep and adaptable for all ages.
Each month I get amazing activities sent to me to do with the girls.
All my friends know about The Activity Room®!
Share your favorite quote
Shoot for the moon, even if you miss you’ll still be among the stars
Easy No-Prep Looking and Listening Activity to Practice Mindfulness
Take some time to lie on the grass outside. You’ll simply be looking and listening to the sounds around you.
That’s right. You don’t need anything else or special supplies for this simple mindfulness activity.
Can you identify the birds? Can you pick out whose car is driving past?
Look at the clouds. What shapes can you make from them?
Who can see the same as you? Who can see something different?
This is such a great activity to practice answering open-ended questions. There is no right answer!
Take turns finding shapes in the clouds or sharing things you see and hear. Try just listening with your eyes closed, too.
How does your family practice observation or mindfulness together? Share your ideas in the comments!
Monday, October 22, 2018
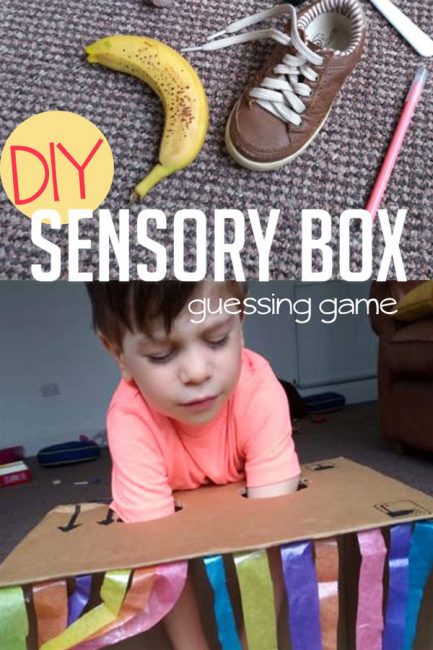
Super Simple DIY Sensory Box Guessing Game for Kids
Click here to read Super Simple DIY Sensory Box Guessing Game for Kids on Hands On As We Grow®
Practice important sensory skills with this fun sensory box guessing game activity from Francis!
We’re a fan of sensory activities in this house. My the kids especially love messy sensory activities!
But sensory doesn’t always mean messy and this activity is a great non-messy one. The sensory box guessing game is good to practice tactile memory and a lot of fun too!
Super Simple DIY Sensory Box Guessing Game for Kids
My kids think everything to do with cardboard boxes is super exciting.
For our sensory box guessing game, we used:
- Cardboard box (medium size)
- Craft knife
- Scissors
- Tissue paper
- Sticky tape

Make sure the box flaps on are open or cut away. This will leave one side of the box as the opening.
On a closed side of the cardboard box, Nathan helped me draw 2 circles. They needed to be large enough to fit his hands through.
Try these cardboard boxes activities to encourage your kid’s creativity!

This part was a bit tricky for him, but he did a good job.

I then used the craft knife to cut them out. This is where he’ll poke his arms through later.
You might want to test them out, just in case. You can always cut them a smidge bigger if needed.

Next, he cut strips of colored tissue paper so we could decorate the opening of the box.
Nathan loves anything that involves using the scissors! I love the extra practice with scissor skills!
The tissue paper is totally optional but we loved the effect it gave our box.

Nathan was intrigued, trying to imagine what he would have to guess in the game.
We stuck the strips to the opening of the box using the sticky tape. Now he was really getting excited!

Use your DIY Sensory Box Guessing Game
Before we made the box, I chose some objects without him seeing. I tried choosing different sized objects and with different textures too.

I hid them behind my back and asked him to kneel behind the box. Then, I sat in front of the open side with the tissue paper streamers.
Next, I asked him to close his eyes. Then, I placed one of the objects inside the box.
He put his hands through the holes on top and picked the object up. All without opening his eyes.
He had to guess what it was just by feeling it.

With the tricky ones, I would ask him a couple of questions to guide him: Was it heavy or light? Did it make any noise? Was it smooth or rough?
He loved guessing them right. Especially when he guessed his favorite fruit: a banana!
This game was a success with his big sister, too. In fact, our whole family played together many times!
I love when an activity gets the family together to play and have fun.