
Click here to read Fun and Easy Travel Journal Keepsake Craft for Kids on Hands On As We Grow
Discover a fun and easy way for your child to record the memories of a family trip or an exciting adventure with a travel journal! Use this tutorial from Alisha to DIY your own.
This journal keepsake craft is a super simple way for kids to capture their memories and fun experiences along the way. It’s also a great learning tool and keepsake for years to come.
Try these traveling activities for kids on your next trip!
Make a Fun and Easy Travel Journal with Your Kids
Capturing those vacation memories is so much fun! It’s so nice to be able to look back afterward on all the wonderful experiences you had together.
I love being able to see our adventures from my children’s perspective. A travel journal helps all of us to remember our trips at these ages.
You only need a few items to make the travel journal and the rest of the items you gather along the journey.
To make your own travel journal, you’ll need:
- Cardstock (affiliate link) or construction paper
- White copy paper
- Stapler
- Glue stick
- Crayons or colored pencils
- Pen or pencil
- Optional: Ziploc bag

How to Make Your Travel Journal
Once you have gathered your supplies, the journal is very easy to put together. You could do it yourself or have your child make it with you.
The cardstock or construction paper will be the cover because it is sturdy to hold up during the trip. Simply fold it in half to form a book.

Then take a few pieces of white copy paper (lined paper would work too) and fold the pages in half as well.
The number of pages will depend on the length of your trip. I decided to have enough paper for at least one page per day.
You can choose to use only the front of each page or front and back.

After you fold the white paper, slide it into the cover and match up the folds the best you can.
Then staple everything together on the middle crease. I do have a long reach stapler (affiliate link) that I used, but you can use a regular stapler as well.

Now your book is made and you’re ready to personalize it with your child.
Decorate Your Travel Journals
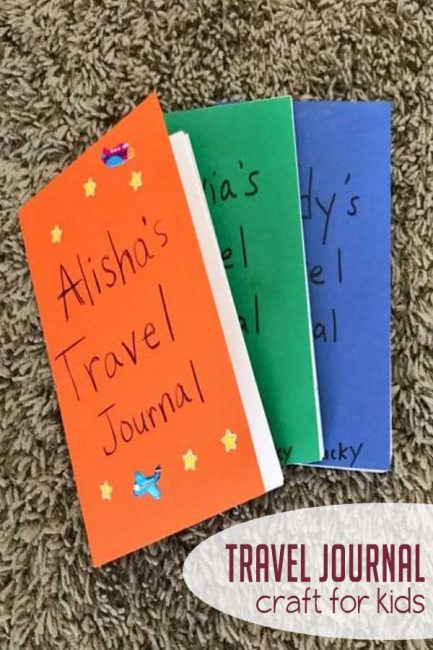
To personalize your child’s travel journal, they can start by decorating the cover.
You could have them write their name (or you could write it) and put travel journal (i.e. Alisha’s Travel Journal).
They could think of a more creative title and also add stickers or drawings on the cover as well.

You could also include a map of where you are going, a plane ticket, or even a hand-drawn compass on the inside or back cover.
Now pack the journal and you’re ready to go!
How Your Kids Can Journal on the Trip
What worked best for us was to write the date at the top of the page. Then, during the day I collected loose items from our travels.
I saved receipts, tickets, leaves, pictures, flowers, postcards, check-in bracelets, and other physical objects. You could carry a Ziploc baggy with you to keep things organized.
Before you leave on your next trip with kids do these 5 things!
Each night we would choose pieces to add to their journals together. If we had more memories they wanted to record, we just went to the next page.
I recommend working on a page or two per day as a reflection activity of your experiences that day.

If your child is young, I recommend gluing for them and helping them to make drawings of the day, even scribbles are fine.
Then you can add a small description sentence, phrase, or word. My preschooler enjoyed tracing some of the words that I wrote.

If you have an older child, they can choose the pieces for their journal, glue them down, and write a journal entry for the day Encourage your child to use words, sentences, phrases, or pictures.

Here are some ideas of things you can include in the travel journal:
- ticket stubs
- daily drawings
- receipts
- nature or animal sketches
- simple phrases or description sentences
- printed photos
- nature items
- ticket bracelets or stickers
- postcards
- full written entries
- stamps
- maps
- brochures or pamphlets
Don’t worry if your plan to create a page or two each night doesn’t work out. There were a few times it didn’t for us.
When we found time later, we just made a few journal entries from the last few days. We always remembered what we had done.
Just remember to collect items each day and store them in a closed bag for safe keeping.
When you get back from your trip, encourage them to share their journal with family and friends. It’s a great conversation tool and a wonderful experience for them to have something they created to share with others.
Store the travel journals somewhere safe and enjoy taking it out every so often to reflect and remember the wonderful memories made.
No comments:
Post a Comment